Vacuum Depot
5359 Granbury Rd
Fort Worth, TX 76133
ph: 8172924472
sales
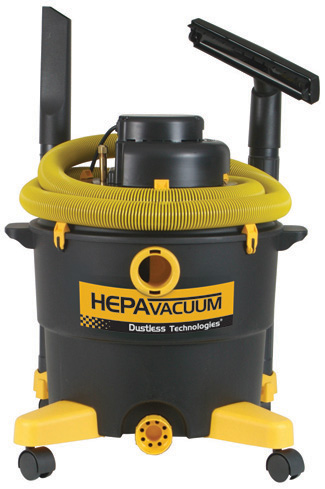
Hepa Rated Construction Vacuums
The dust control products from Dustless Technologies are specially designed to capture the extra fine dust created by cutting and grinding with diamond tools and also from drywall sanding.
The heart of the Dustless System is Wet Dry Vacuum. It is not your typical shop vacuum. Tradition shop vacuums are not designed to capture the extra fine dust from diamond blades, diamond grinding wheels and drywall sanders. Cheap shop vacuums are fine for course saw dust and dirt but they cough and spew fine dust whenever they are turned on.
The Wet Dry Vacuum has a patented double filter system that can be cleaned without opening the canister to keep extra fine dust from getting airborne. An optional micro pre-filter also captures particles down to .5 microns. That’s almost as effective as a HEPA filter, which captures particles down to .3 microns.
We also offer a HEPA version of the Wet Dry Vacuum for remodelers and contractors that need to meet OSHA, EPA and NIOSH guidelines. The HEPA vacuum is certified to meet critical standards.
You can also get a Dustless Wet Dry Vacuum with patented ToolSync technology that enables contractors and remodelers to turn power tools off and on in tandem with the Dustless vacuum. The ToolSync system is designed so that you can run both the vacuum and a larger hand grinder off the same circuit without blowing a fuse. The way it does it is by channeling most of the power to the hand tool during start up, and after the tool is up to speed and the amp draw drops, more of the amperage is transferred to the vacuum. ToolSync is for the professional that wants to maxamize job site efficiency and avoid the hassles associated with blown fuses.
Dust Collection Products offers several types of dust shrouds for use with hand grinders. The Dustie is the most economical solution. It features a flex-flange mounting collar that makes it very easy to mount on to all popular makes of hand grinders. Simply slip it in place and tighten a band clamp. The Dustie is made of flexible, lightweight plastic that permits the operator to work at a variety of angles while capturing 99% of the airborne dust.
EPA Lead Paint Regulations and Renovation Contractor Certification Requirements
This is Instructor's notes for people training contractors to become certified, under new EPA regulations, to perform renovation work on buildings that contain lead paint. The new EPA regulations are effective April 1, 2010.
Please note: While the EPA mandates the use of a HEPA vacuum, not all vacuums that use a "HEPA" filter meet government standards. Traditional shop vacuums retrofitted with a HEPA filter do not constitute a "certified" status, and fines as high as $32,000 are being reported for not complying with standards. The Dustless HEPA Vacuum uses a Certified HEPA filter and meets all government requirements, and are priced to be affordable for small contractors.
Instructor's Key Message: Cleanup right. Use wet mops and HEPA vacuums. Traditional methods don’t do the job.
Cleaning Activities and Checking Your Work
This module focuses on how to clean the work area in order to pass both a visual check and either a verification check or clearance. A visual check means that an area has been cleaned to the point that no dust, debris or paint chips can be seen with the naked eye. The verification check involves comparing a disposable cleaning cloth used following cleaning to a standard verification card to determine cleanliness. Clearance involves taking dust samples and having them analyzed and compared with applicable dust standards to determine if the area is adequately clean.
Effective cleaning includes using specific techniques and following the proper order when cleaning. In this section, participants will learn:
- How to conduct an effective cleaning;
- The tools to always keep in your truck and at the work site;
- Effective techniques to clean up after both interior and exterior jobs;
- Safe disposal methods; and,
- How to check your work.
What is Effective Cleanup?
Just as you approach a job by planning the work to effectively contain dust and debris, you must approach cleaning by first having effective containment, then carefully following specific procedures to best clean the work area. The techniques outlined in this section should make your cleanup faster, more efficient, and more effective.
Remember:
- Always conduct a visual check of the work area to make sure all work is complete.
- Proper waste disposal and checking your work are essential to the process of cleaning.
- The most effective cleaning will follow this sequence:
1. Pick up all visible paint chips and debris.
2. Clean and dispose of protective sheeting.
For interior renovations:
- Walls - slowly HEPA vacuum or wipe with a damp cloth, working from high to low.
- Other surfaces - thoroughly HEPA vacuum all surfaces including furniture and fixtures. Wipe any remaining surfaces with a damp cloth. The HEPA vacuum must have a beater bar for use on carpeting.
- Mop uncarpeted floors using the two-bucket mopping method.
- Visually inspect your work.
- Bag all waste in heavy-duty plastic bags, “gooseneck” seal, and dispose of them according to Federal, state and local regulations.
- Perform cleaning verification on windowsills, countertops and uncarpeted floors.
- Remove warning signs.
- Demonstrate how to “gooseneck seal” a heavy duty plastic bag and note that this will be covered again in the disposal section.
- Discuss why this cleanup sequence should work well.
- Picking up all visible debris and paint chips prepares a work area prior to the first HEPA vacuuming.
- Clean and dispose of protective sheeting. This step should come before HEPA vacuuming in order to collect any dust that may escape from the protective sheeting.
- HEPA vacuum the area from high to low. This first HEPA vacuuming will collect dust and debris not visible to the naked eye.
- Wet cleaning and mopping the area will further dislodge any lead-contaminated dust or debris not collected by the first HEPA vacuum. Wet cleaning also gets dust and debris that is “stuck” to surfaces.
- If necessary, a final pass with the HEPA vacuum or wet cleaning cloth will capture any remaining dust or debris left after the wet cleaning.
- The last step should be to check your work to make sure that visual check inspection can be passed, and all waste is bagged, sealed and disposed of in accordance with Federal, state and local laws.
A dust clearance examination may be required by Federal, state, tribal or local law, or it may be requested by the homeowner. If so, the clearance examination will replace the cleaning verification process. Clearance is required by HUD in many homes receiving Federal housing assistance.
Interior Cleaning Requirements
- Why should you pick up paint chips and other debris before picking up the protective sheeting? Why should you mist down and wet wipe the protective sheeting before picking it up? Answer to both questions: To prevent accidental spreading of lead-contaminated paint chips and dust off of the protective sheeting.
- After the first visual inspection of the work area, cleaning, folding and disposing of the protective sheeting is the next step. Clean your protective sheeting with a HEPA vacuum and wet wipe if necessary. Once cleaned, fold (dirty side in) and seal the sheeting and dispose with the rest of your waste. When you pick up and fold the protective sheeting (dirty side in), be careful not to spread any dust that may remain on the sheeting.
- This process is followed by HEPA vacuuming and wet mopping (discussed in the next slide) to clean up any dust that escaped the protective sheeting.
- Note that the sheeting covering the entry to the work area should stay in place until after the cleaning and removal of other sheeting.
- Workers must always clean at least 2 feet beyond the work area.
- Cleaning from high to low is more efficient and effective because any dust or debris dislodged will fall down to the floor. Just as one would clean steps working from the top down, cleaning a work area should proceed from high to low to “push” all dust not collected down to the floor, which should be cleaned last.]
Visual Inspection Procedure
- Always conduct a visual check after cleaning is completed. If you find any dust or debris, make another pass with the HEPA vacuum and, if necessary, wet clean again. You should continue these steps until the site passes a visual check.
- After passing a visual check, you can perform the cleaning verification procedure or have a clearance examination performed to check your work. In some instances, other dust sampling may be required.
- Cleanup should always be performed as if a clearance examination is to be conducted after cleaning.
Cleaning Verification (CV) Procedure
- This describes the cleaning verification procedure in detail. The instructor should walk students through the procedure.
- Tell the students they may keep the cleaning verification card if they successfully complete this course. These cards are provided by EPA to accredited training providers for distribution to Certified Renovators.
Demonstration: Depending on the time available, the instructor should demonstrate the cleaning verification process either during the lecture or as a part of the hands-on exercise. The demonstration should include attaching a wet disposable cleaning cloth to an application device, cleaning a known area of the floor, removal of the cloth, and comparing it to the cleaning verification card.
Whether or not you do the demonstration here, you should show the students the cleaning verification card and make sure that they understand how to conduct and interpret the results of the comparison process.
Discuss the carpet cleaning procedure and emphasize that the cleaning verification procedure does not apply to carpets; therefore, extra care must be taken in carpeted areas to not get dust on the carpet. This may require extra layers of plastic as a good work practice to prevent dust from getting in the carpet during conduct of the work.
The hands-on exercises in this module are mandatory.
Dust Clearance Examination
Discuss the following instances, where a dust clearance examination (40 CFR 745.227(e)(8)) may be required or requested instead of the cleaning verification procedure:
- HUD requires a dust clearance examination after certain kinds of jobs in target housing receiving Federal housing assistance. Ask if the property receives Federal assistance. If so, ask if a clearance examination is required.
- In some states, a clearance examination conducted by a certified or trained person may be required by law. You should be aware of laws regarding clearance examinations and renovation work in your state and locality.
- In some instances, the owner may request that dust wipe samples be taken to locate lead hazards and to ensure cleaning has been effective. If you follow the cleaning techniques described earlier, you should pass be able to pass clearance testing.
- Emphasize that once you begin a clearance examination, if the clearance fails you must continue the cycle of re-cleaning, visual inspection, and dust wipe testing until the dust wipe results comply with the clearance standards governing the work.
Exterior Cleanup Requirements
- The main point of cleaning after an exterior renovation job is not to let dust spread beyond the work area. The focus is to be specifically on the areas accessible to children. This includes bare soil, play areas, exterior porches and exterior window sills.
- Always visually inspect beyond the work area. Collect and dispose of all paint chips, dust and debris found.
Exterior – Check the Effectiveness of Cleaning
- Discuss why a visual inspection for checking the cleaning is necessary.
- The visual inspection checks for visible dust and debris and includes all parts of the work area, areas not covered by the protective sheeting, and areas 2 feet outside the containment.
Disposal
Have bags and tape ready for the demonstration, if you choose to perform it, and for the required hands-on activity.
- Waste should be stored in a secure area to prevent children from getting into it and being exposed to leaded dust.
- Discuss methods to handle waste water.
- Waste water produced during the job from mopping, wet cleaning, or misting should not be poured down the sink or tub (because it will contaminate the sink or tub), into the yard or down a storm drain.
- Before disposal, waste water may need to be filtered through a filter capable of filtering out particles 5 microns or larger, depending on state and local wastewater regulations.
- If local regulations allow, waste water may be poured down the toilet. If local regulations do not allow this, you may be required to contain and test the water, and contact a waste disposal company to assist you with disposal. Your local water authority can assist you with this decision.
- Always be aware of Federal, state and local regulations regarding waste water disposal.
- All waste should be handled carefully and sealed in heavy duty plastic bags.
- Do not overfill the bags. Renovation debris is heavy, and, if overfilled, will split the bags and could injure workers.
- Certified Firms must be aware of all components of the waste produced at the job site and of the proper method of disposal. Again, always be aware of Federal, state and local waste disposal regulations.
Disposal - Federal, State and Local Information
- Waste disposal is regulated under the Resource Conservation and Recovery Act (RCRA), and various associated state and local laws and regulations.
- Some waste generated from lead work may meet the definition of “hazardous waste” because it is toxic, corrosive, ignitable or explosive. Therefore, it is important for contractors to segregate waste into categories that are likely to be hazardous and non-hazardous. Examples of hazardous waste may include paint chips, vacuum debris, sludge or chemical waste from stripper, and HEPA filters.
- Generators of less than 220 pounds of waste per job site per month are exempt from Federal waste disposal regulations and most state regulations.
- Many states have more stringent regulations than Federal requirements. It is, therefore, important for contractors to understand their obligations under these laws and regulations.
- You should always be aware of how much waste you are generating per job site per month.
- EPA’s website has links to state information on solid and hazardous waste disposal at http://www.epa.gov/epawaste/wyl/stateprograms.htm.
- In a memorandum to RCRA Senior Policy Advisors and EPA Regions 1-10, dated July 31, 2000, EPA’s Office of Solid Waste stated that lead-based paint waste from households may be disposed of as household garbage subject to applicable state regulations. For more information, see Appendix 8 and the EPA website at www.epa.gov/lead/pubs/fslbp.htm. Although EPA considers lead-based paint waste commonly generated during residential renovation and painting to be household waste, some states have not yet adopted this interpretation. Until states do adopt EPA’s interpretation, they may continue to regulate lead-based paint waste as potentially hazardous if generated in large enough quantities.
Exercise: Cleaning and the Cleaning Verification Procedure
Prepare this exercise in advance:
Have appropriate tools and supplies ready. Necessary tools and supplies include buckets, mops, water, detergent, a HEPA vacuum, wipes, plastic sheeting, plastic bags, tape, disposable cleaning cloths and cleaning verification cards. See Skill Sets #7 - #11 for a complete list of materials and supplies.
- You will need access to water.
- Sprinkle each work area with corn starch or baby powder to simulate dust.
- Refer to the Skill Sets #7 - #11 following and in Appendix 6 for a list of skills that participants should practice.
- Vary the color and type of work area surfaces if possible.
When conducting the exercise:
- Instruct participants to stay in their groups.
- Circulate while they work to ensure they are doing the work properly.
- Coach them as necessary to correct any incorrect behaviors.
- Give them a 5-minute warning.
- When the time for each skill set is up, tell them to stop. Keep to the schedule.
Option
You may also perform this cleanup exercise later in the course as part of a larger comprehensive hands-on module as described in Lesson Plan 2 in the Note to the Instructor on How to Use This Curriculum in the introduction. The comprehensive hands-on module combines the hands-on components from Modules 4, 5, and 6.
Note: In some training facilities, such as hotels, you may not have access to water in the training room. In such cases, instruct participants to walk through the process - practicing the order of the steps: HEPA vacuum, two bucket wash, cleaning from high to low, etc. As a demonstration of how hard it is to clean up dust, consider sprinkling corn starch or baby powder on a tabletop and experimenting with different methods for cleaning it up - broom and dust pan, HEPA vacuum, wet wipe, etc.
Pending OSHA standards are mandating worker protection from harmful air-borne particles created from drywall sanding and diamond tool grinding of concrete, masonry and stone materials. The dust from these materials is tied to lung cancer, silicosis and other serious maladies. In some areas right now, contractors are not allowed on the job without having a dust-containment system.
LEADSAFETY for Remodeling, Repair and Painting
Interior Final Cleaning
Step 1: Wrap and seal, or bag all components and other large materials and then remove them from the work area.*
Step 2: Clean off the plastic sheeting using a HEPA vacuum (this procedure is not required, but it is faster than wiping up dust and debris by hand). Mist the plastic sheeting and fold dirty side inward. Either seal the edges of the folded plastic sheeting with tape or place it in a heavy-duty plastic bag. Dispose of the protective sheeting.*
Step 3: Remove all waste from the work area and place in appropriate waste containers.*
Step 4: Clean all surfaces within the work area and in the area 2 feet beyond the work area until no dust or debris remains. Start cleaning at the top of the walls and work down toward the floor, HEPA vacuum or wet wipe all wall surfaces in the work area. HEPA vacuum all remaining surfaces in the work area, including furniture and fixtures. Use the upholstery attachment for the window surfaces and the crevice tool along the edge of the walls. Use the HEPA vacuum with a beater bar for carpeting. Work from the end farthest from the work area entrance back to the entrance, making sure never to step back into areas that have already been cleaned.*
Step 5: Next, wipe all remaining surfaces and objects in the work area except for carpeted and upholstered surfaces, with a disposable wet cleaning wipes. Also mop uncarpeted floors using a two-bucket method or wet mopping system. Work from the end farthest from the work area entrance back to the entrance, making sure never to step back into areas that have already been cleaned. For carpeted areas, conduct a second pass with the HEPA vacuum using the beater bar attachment instead of wiping with a wet cleaning cloth.*
Step 6: If the property is HUD-regulated, repeat Step 4 for walls, countertops and floors, and then continue to Step 7. Otherwise, continue to Step 7.
Step 7: After completion of cleaning procedures, check your work. Conduct a careful visual inspection of the work area for visible dust and debris. If visible dust or debris is found, repeat Steps 4 and 5 as needed to make sure no visible dust or debris is present, and then re-check your work with a thorough visual inspection of the work area. When there is no visible dust or debris present, proceed to step 8.*
Step 8: Notify the Certified Renovator in charge of the project that the work area is ready for visual inspection.*
*Indicates required skills that must be accomplished for a “Proficient” rating.
Copyright 2010 Vacuum Depot. All rights reserved.
5359 Granbury Rd
Fort Worth, TX 76133
ph: 8172924472
sales